WooCommerce product badges: Sale, New and Bestseller labels
By Mariusz Szatkowski · Updated: 2026-09-11
In a grid of similar products, the items that get clicked are the ones that stand out. Product badges are one of the cheapest ways to make that happen: a small Sale, New or Bestseller label on the product image that catches the eye and gives the shopper a reason to look closer. They cost nothing to show, they reflect facts you already hold about each product, and they work at the exact moment a visitor is scanning a category trying to decide where to click first. This guide explains how badges work in WooCommerce, which ones actually move sales, what a good badge tool needs, and how the free Marks plugin adds automatic and manual badges without hurting performance.
What product badges are
A product badge is a small label placed over the product image, shown both in listings and on the single product page. Each badge carries a short, glanceable message that a shopper can read without stopping to think. The common ones map directly to things a customer cares about:
- Sale or a discount percentage, signalling a price cut.
- New, marking recently added products.
- Low stock, adding gentle scarcity.
- Bestseller, adding social proof.
- Free shipping and Out of stock, answering two questions a shopper would otherwise have to click through to find.
The value of a badge is that it surfaces a fact at the deciding moment. A shopper scanning a category is not reading every title and description; they are scanning for cues. A badge is a cue, placed exactly where the eye already is.
Why they lift conversion
Badges work because shopping online is fast and visual. The decision to click a product happens in a second or two, and it is driven by whatever stands out. A well-placed badge gives the shopper a reason to stop:
- Urgency from Sale, Discount percent and Low stock labels, which nudge a decision rather than a “maybe later”.
- Reassurance from Bestseller, which borrows the confidence of other buyers without the shopper having to read a single review.
- Freshness from New, pointing returning visitors straight at what changed since their last visit.
- Clarity from Free shipping, which removes a common reason to hesitate before opening a product.
The gain comes from relevance, not decoration. A store that badges everything trains shoppers to ignore badges. A store that badges the true and the useful, the genuinely discounted item, the genuinely low stock, earns the click. The discipline is in showing fewer, accurate badges, not more.
Tip: Show fewer, truer badges. Badging everything trains shoppers to ignore them; two or three accurate badges read clearly where six do not.
Automatic beats manual
The most useful badges run on rules, so they stay accurate without anyone editing products by hand. A manual “Sale” sticker someone forgot to remove after the sale ended is worse than no badge at all, because it teaches shoppers that your badges lie. Rule-based badges avoid that entirely:
Warning: A manual “Sale” sticker left on after the sale ends is worse than no badge at all, because it teaches shoppers that your badges cannot be trusted.
- Sale appears whenever a product is discounted and disappears the moment the sale ends.
- Discount percent reads the same price data and shows the size of the cut.
- Low stock appears when inventory falls to or below a threshold you set.
- New appears for a set window after a product is published, then retires itself.
- Bestseller appears once a product passes a sales count you choose.
Manual badges still have a place for the cases rules cannot express, such as a hand-picked staff pick or a seasonal callout on one specific product. The right tool offers both, with automatic badges doing the bulk of the work and a manual badge available where you genuinely need to override. Marks for WooCommerce supports both: a set of automatic, rule-based badges plus a single manual badge per product.
What a good badge tool needs
Before looking at any specific plugin, it helps to know what separates a badge tool worth installing from one that creates more problems than it solves. Use this as a checklist:
- Rule-based automation. Badges that compute themselves from real product data, so they are always current.
- Configurable thresholds. You decide what counts as “new”, “low stock” or “bestseller”, because those numbers differ by store.
- Per-badge control. Turn each badge type on or off independently, and set its label text, so the wording matches your brand and language.
- CSS-only rendering. A badge is a label; it does not need JavaScript. Rendering with CSS adds no script to download or run.
- No layout shift. The badge should sit in reserved space so it never pushes the image or title around as the page loads, which protects your Core Web Vitals.
- Placement control. Decide whether badges show on listings, single product pages, or both.
- An appearance that fits your theme. Shape, capitalisation and a sensible limit on how many badges stack on one image.
Two things are deliberately not on that list for a free, general-purpose tool: animations and heavy customisation per product. Badges that bounce or fade draw attention to themselves rather than the product, and per-product styling is a maintenance burden that rule-based badges exist to avoid.
How Marks does it
Marks is a free, open-source plugin that puts badges on WooCommerce products and is built around the checklist above. Everything it shows is computed on your own server from data WooCommerce already holds, price, stock, sales, product dates and shipping class, so there is nothing to sync and nothing sent anywhere.
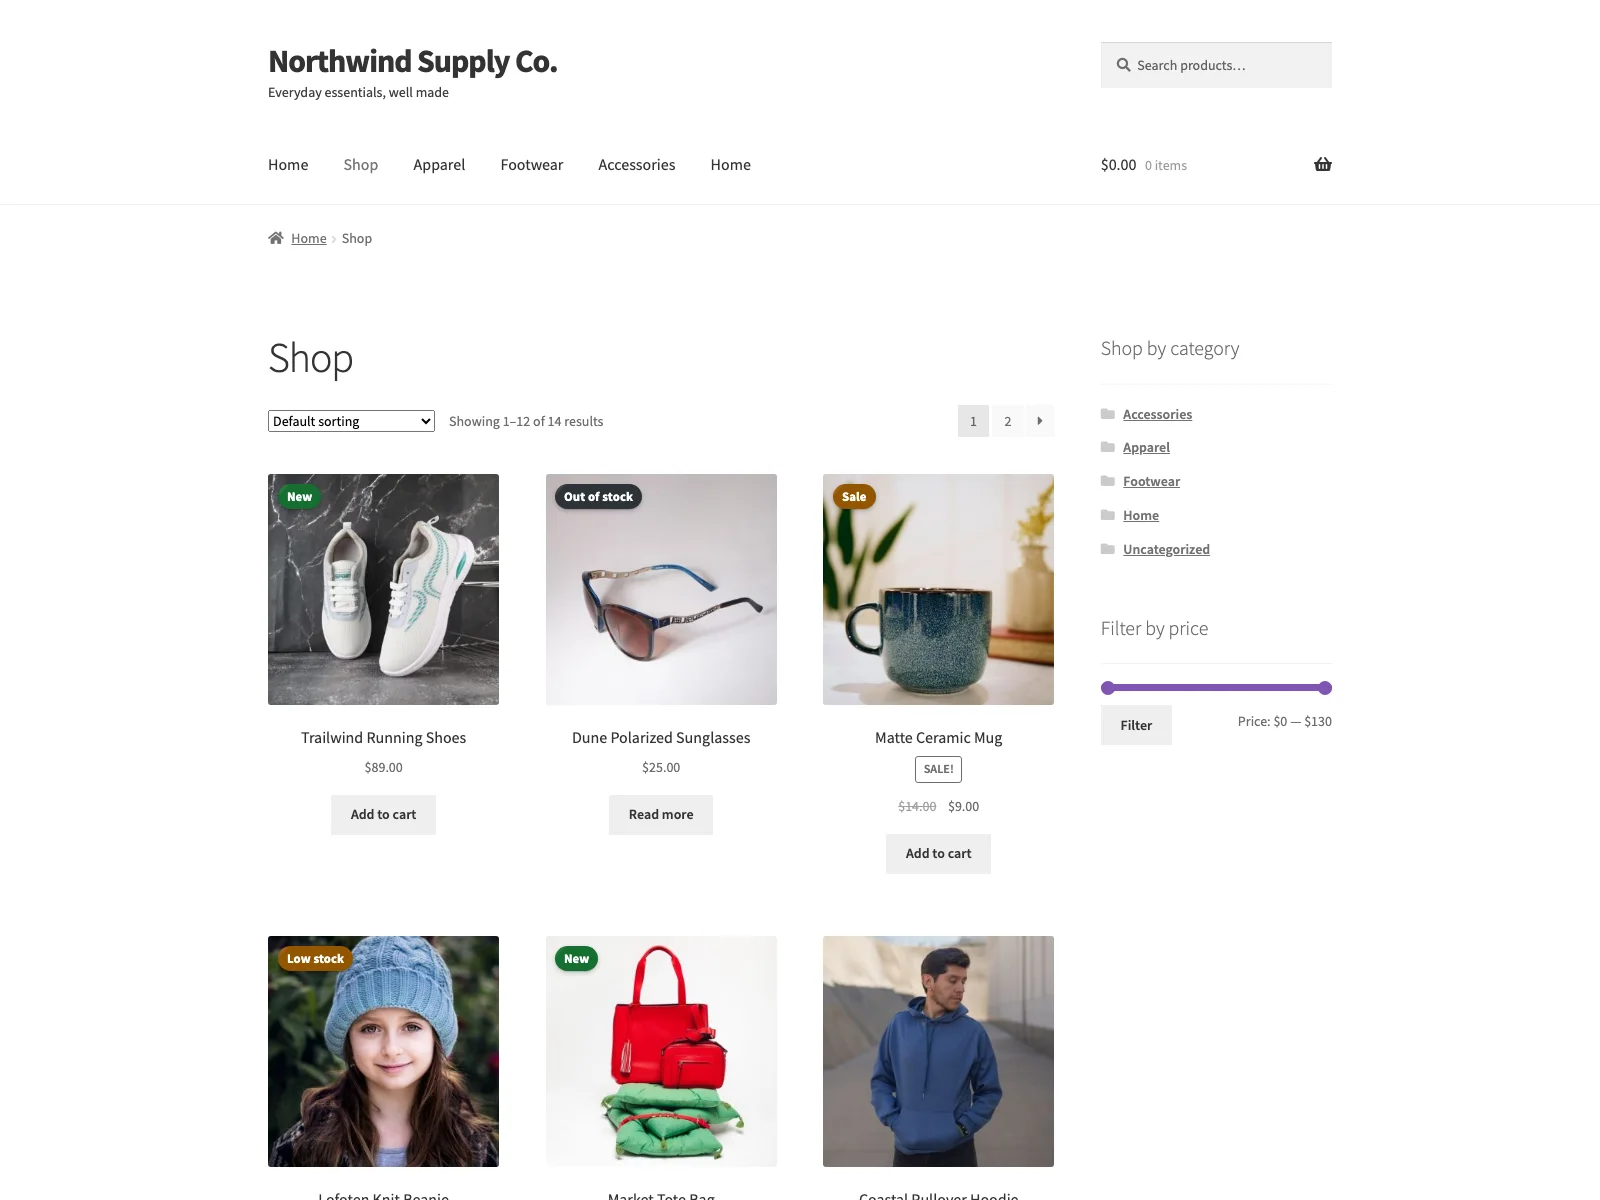 Automatic Sale, New and Bestseller labels on storefront product cards, all rendered CSS-only.
The automatic badges
Marks ships seven automatic badges: Sale, New, Low stock, Bestseller, Discount percent, Free shipping and Out of stock. Each one has its own on/off toggle and its own custom label, so you can rename “Sale” to “Promo” or translate every label to your store’s language. Three of them read thresholds you control: the newness window (30 days by default) decides how long New shows, the low-stock level decides when Low stock appears, and the bestseller sales count decides when Bestseller kicks in. Free shipping is detected by a product’s shipping class. Because all of this is rule-based, the badges stay correct on their own as prices change, stock moves and products age out of the New window.
The manual badge
For the cases rules cannot cover, Marks adds a single manual badge: a store-wide label and colour that you switch on per product. You set the label and colour once on the Marks settings screen, then attach it to specific products through the _marks_manual_text product meta (with an optional _marks_manual_style). This is the right tool for a staff pick or a one-off callout, kept deliberately simple so it does not become a per-product styling project.
Rendering and placement
Note: Every Marks badge is rendered CSS-only, so it adds no JavaScript to download or run and causes no layout shift, which keeps listing pages fast and stable.
Every Marks badge is drawn with CSS and sits over the product image, so it adds no JavaScript and causes no layout shift when the page loads. Badges show on the single product page and on shop, category and tag listings, and placement controls let you choose single pages, listings, or both. Appearance controls cover the shape (pill or square), uppercase text, and a per-context cap so a single image never ends up smothered in five overlapping badges. There is also an optional setting to hide WooCommerce’s own default sale flash when the Marks Sale badge is on, so the two do not collide.
The shortcode
If you want badges somewhere outside the normal product templates, a page, post or widget, Marks provides a [marks_badges] shortcode. With no attributes it uses the current product inside a loop or on a single product page. Pass an id to target a specific product and context (single or loop) to pick the render style, for example [marks_badges id="123" context="loop"].
Setting it up
Getting badges live takes a few minutes:
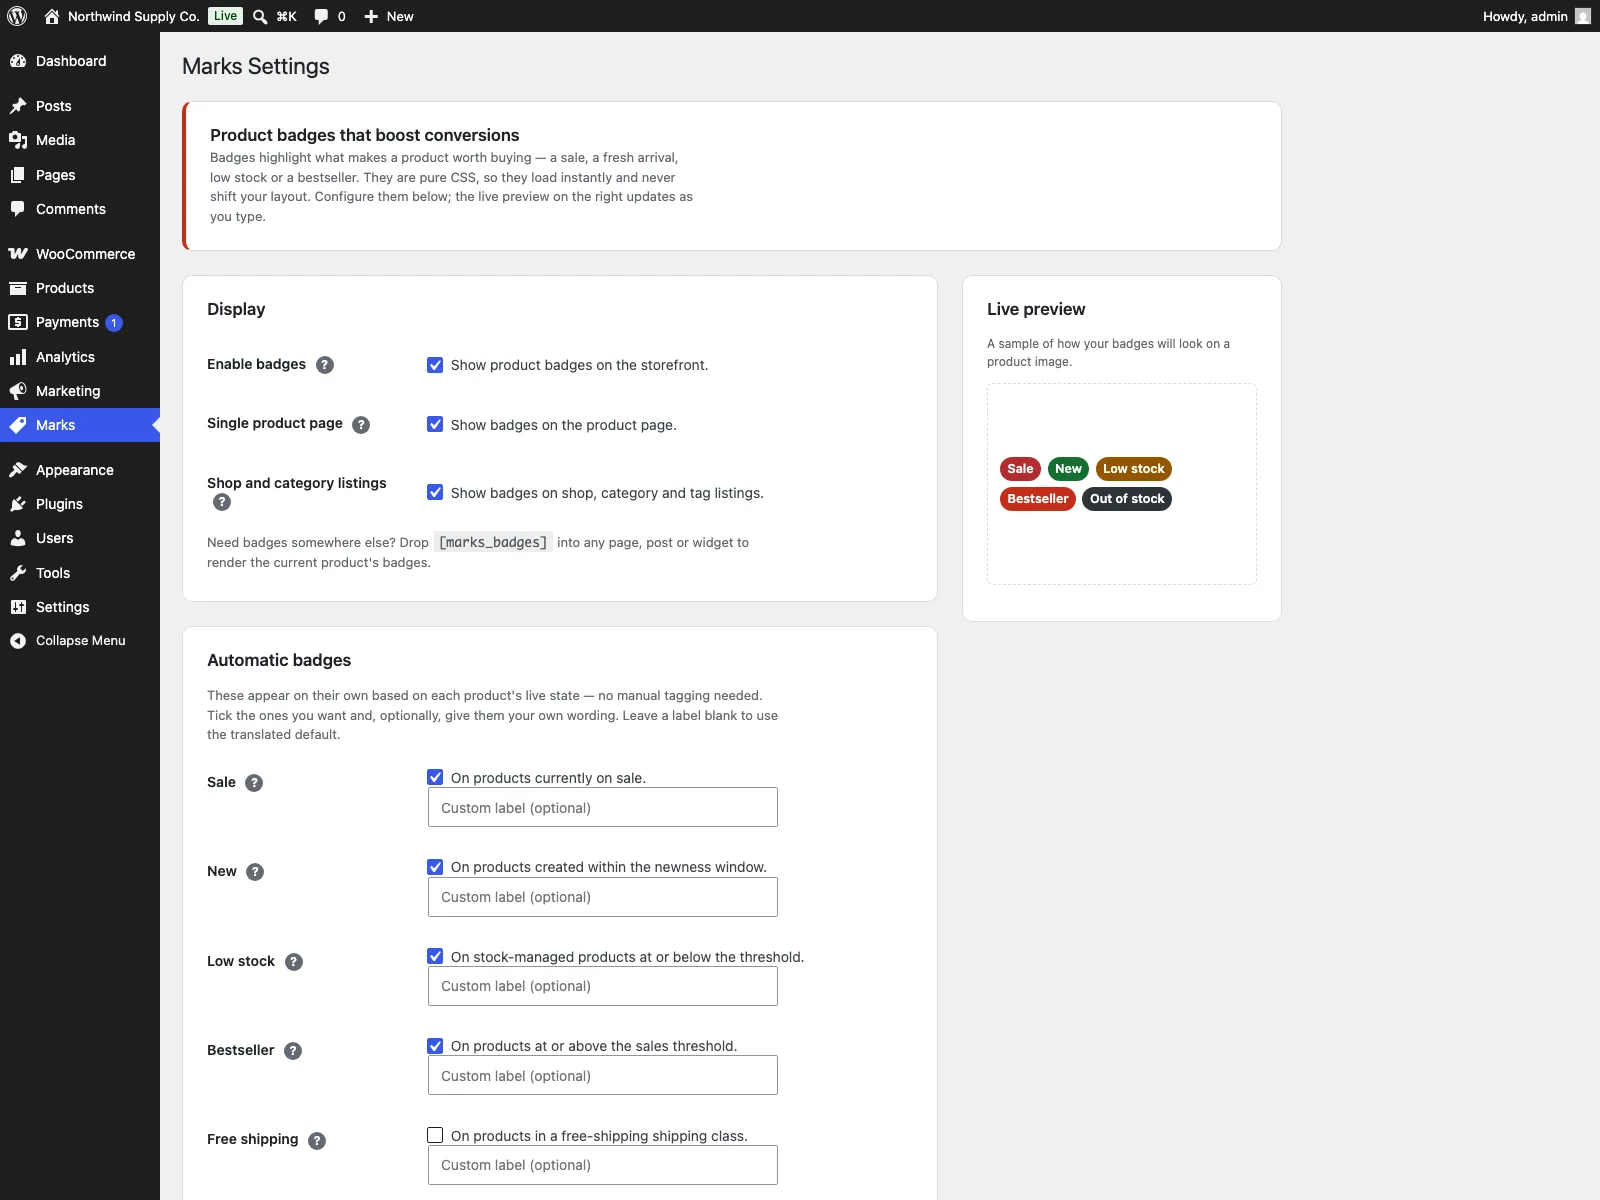 The Marks settings screen in wp-admin, where you toggle each badge and set its label and thresholds.
- Install the plugin from Plugins > Add New, or upload it to
/wp-content/plugins/plogins-sale-stock-badges. WooCommerce must be installed and active. - Activate it.
- Open the top-level Marks menu, switch badges on with the global toggle, and choose which automatic badges to show.
- Adjust the thresholds (newness window, low-stock level, bestseller sales) to match your store, set the labels you want, and pick placement and appearance.
That is the whole setup. Settings are sanitised and clamped on save, the plugin is translation-ready with a bundled POT file, it declares HPOS and cart/checkout blocks compatibility, and it removes its data cleanly on uninstall.
Practical tips
A tool gives you the mechanism; how you use it decides whether badges help or become noise. A few pointers:
- Show fewer, truer badges. Resist badging everything. The per-context cap exists for a reason: two or three relevant badges read clearly, six do not.
- Tune the thresholds to your store. “Low stock” means something different for a maker selling ten units than for a warehouse selling thousands. Set the low-stock level and bestseller count to numbers that are actually meaningful for you.
- Match the New window to your catalogue rhythm. A store that adds products weekly wants a shorter newness window than one that refreshes a range each season, so the New badge points at what genuinely changed.
- Write labels in your voice. The custom label text is there so badges sound like your store, not a generic plugin. Keep them short; a badge is read in a glance.
- Mind the default sale flash. If you enable the Marks Sale badge, turn on the option to hide WooCommerce’s built-in sale flash so you are not showing two competing markers on the same image.
Marks versus default WooCommerce
Core WooCommerce shows only a single “Sale” flash on discounted items and nothing else. Here is the difference for product badges specifically:
| Capability | Default WooCommerce | Marks |
|---|---|---|
| Badge types | Sale only | Sale, New, Low stock, Bestseller, Discount percent, Free shipping, Out of stock |
| Automatic, rule-based badges | Sale only | Yes, seven rules with configurable thresholds |
| Custom label text | No | Yes, per badge |
| Manual badge | No | Yes, one per product |
| Placement control | No | Single page, listings, or both |
| Appearance control | No | Shape, uppercase, per-context cap |
| Shortcode placement | No | [marks_badges] |
| Rendering | Theme-dependent | CSS-only, no JavaScript |
| Layout stability | n/a | No layout shift |
| Scheduling, conditional rules, image badges, A/B | No | Yes (PRO) |
| Cost | Free (core) | Free (GPL); PRO adds campaigns, conditions, image badges and A/B |
Free versus PRO
The free Marks plugin is a complete badge tool, not a teaser: seven automatic badges with custom labels and thresholds, a manual badge, placement and appearance controls, the shortcode and CSS-only rendering are all included. Marks Pro is a paid add-on that requires the free plugin to be installed and active, and it builds on top for promotion-driven and high-volume stores:
- Scheduled and targeted badges. A dedicated admin page where you define campaign badges with a label, custom colours, an optional start and end date window, and targeting by specific product, category or tag. Each badge renders automatically only while inside its schedule window and matching its targets.
- Conditional display rules. Store-wide rules that render a styled badge when a product matches a condition, such as belonging to a category, a price above or below a threshold, or stock at or below a quantity.
- Image badges. A per-product image badge URL for a certification or brand logo, rendered at a fixed height with aspect ratio preserved so it does not shift the layout.
- A/B label sets. Competing badge labels rotated across visitors with sticky cookies and per-variant impression counts, so you can test which wording actually wins.
If your badges are static facts about products, the free plugin covers you. If you run timed campaigns or want to test labels, that is where PRO earns its place.
The short version
Product badges are a small, high-leverage addition: they make the right products stand out and give shoppers a reason to click. Prefer automatic, rule-based badges so they stay accurate as prices, stock and product age change, keep them few and true so they keep their meaning, and render them CSS-only so listing pages stay fast and stable. The free Marks plugin gives you seven automatic badges, a manual badge, custom labels, thresholds, placement and appearance controls, all CSS-only with no JavaScript and no layout shift; Marks Pro adds scheduled campaigns, conditional rules, image badges and A/B label sets when you are ready to run promotions and test what works.